I've never considered myself a "conservationist", but the more I dive into the whole renovation process, I'm realizing what a fun challenge it is. The idea here is to re-use as much as possible. And what I can't re-use, I'm making efforts to recycle. While I am glad that all of this is beneficial to the environment, I have to admit that the biggest motivation for me is saving money.
Re-use
One of the most obvious ways to save money on what will be a substantial project is to re-use as many things as I can throughout the remodeling process. In other words, why go out and buy something if I already own one of those somethings? Sure, if something is worn out beyond usefulness, or if it is plain ol' ugly, I'll get rid of it (although there is a better option than just tossing it in the dumpster -- more on that in a minute). But why throw away an existing window if I can restore and re-use it? Not only will I have a cool old historic window that matches the rest of those in the house, I will also have saved myself several hundred dollars to boot.
For example, there are three large windows in our dining room that will be taken out to open up an entry into the future kitchen addition. There is also a smaller window that will be removed to make a passage from the kitchen into the future butler's pantry (i.e., the current kitchen). If I were to throw away these windows and buy something of comparable quality (which would be tough to find), I would have to spend somewhere in the $3000 - $3600 range. High-quality windows are expensive, let me tell ya.
What we will do instead is re-use these windows. Our architect has already mentioned that she plans on using the three dining room windows in the future master bedroom addition. And the smaller window will replace an awkward circa 1959 window that, for reasons unknown, replaced an original window when the kitchen was remodeled many years ago by the previous owners. Reusing the windows (plus some others that I'll write about in a future blog) will save a LOT of green ($$).
There is another way to re-use items, even if I don't re-use them myself. Habitat For Humanity has something called the Habitat Re-store. It is a store where people can donate virtually any sort of building material or appliance that is in good enough shape to re-use -- doors, shutters, vanities, cabinets, light fixtures, appliances, windows, plumbing fixtures - you name it. Not only does it keep perfectly usable (albeit outdated) items out of the landfill, donors also can deduct the value of the item on their taxes as a charitable donation. These items are a great buy for people who own rental properties, or others who perhaps can't afford brand new items for their own home. And once in a while, you can come across a real treasure at the Habitat Restore. Several years ago, my wife bought a pair of large leaded-glass cabinet doors (probably from the 1920's) for only $12!! We've been storing them for years and now plan to use them when we build in a china hutch as part of our remodel.
In the cases where we can't re-use something, recycling is also a good option.
Recycle
I'll be the first to say that I am by no means a tree-hugger. However, I am discovering that recycling not only makes good use of resources, but it can also be a way to make back some of the money that we are spending on the remodeling. Anything that is metal is worth cash -- aluminum, steel, brass, copper, lead, etc.
You wouldn't think there's much steel in a traditional construction home, but it is amazing how many pounds of steel you can come up with when you start pulling nails. Honestly, we've just started scratching the surface of this remodeling project, but you wouldn't believe the number of nails and deck screws I've pulled/removed. Instead of throwing them away, I just started throwing them into a five-gallon pail. So far, I have filled two buckets, each of which weighed about eighty pounds. Then there were the bolts and brackets that held the deck joists to the posts -- probably another thirty pounds. Old pipes, old chains, old curtain rods, old shower pan, etc. To date, I've hauled 1000 pounds (literally) to the scrap yard.
The really good stuff, though, is copper and brass. Remember when I wrote about having the new electric service panel installed? I told the electrican to just leave the old wire and conduit. Just from the few feet of copper wire that carried power from the weatherhead above the electric meter to the old service panel, I got $24.50 from the scrap yard.
All together, my metal salvaging has earned me $100.25 so far (and we really have just barely started the remodeling). There will be several thousand pounds more steel when we remove the boiler, piping, and radiators. And then there will be the old copper wire and plumbing that has yet to be replaced. Then there will be a few hundred pounds of aluminum when I get around to replacing the old storm windows with nice wooden ones.
The money I've made so far isn't such a big deal, but my choice is to either recoup a little on what I scrap, or pay the city to haul it off. It doesn't make much sense to me to pay someone to haul away something that has actual cash value.
Anyone have some old metal laying around that you'd like me to haul off for you? Anyone?
Monday, June 28, 2010
Monday, June 21, 2010
The Summer Of 1915
Having only a window unit air conditioner in our house, we are developing an appreciation of what the summer of 1915 might have felt like in this house. I don't know what the actual temperatures were in 1915, but there was another summer not too many years later that must have been similar to the hot weather we're having now. It was 1921.
Since most of our evenings are spent either indoors (sticky) or outside working on removing the old deck (downright sweaty), we are getting a little dose of early 20th-century Americana, particularly the decades of hot summers that were spent in this house. My curiosity got the best of me, so I started looking for weather archives online. The only records I could find for 1915 were accompanied by a request for a hefty $34.95 access fee to the information. NoThankYouVeryMuch.
I did find, however, some old newspapers on the Library of Congress website. One of the newspapers from the 1920's was The Columbia Evening Missourian. The front page of each edition reported the weather for the day. The print dates available varied, but I was able to find an edition that came right from the steamy summer of 1921. July 12th, to be exact. Warren G. Harding was president.
The high on July 12, 1921 was 94 degrees. The forecast for today was 95 degrees, although I'm not sure what the actual high ended up being. Regardless, it was hot.
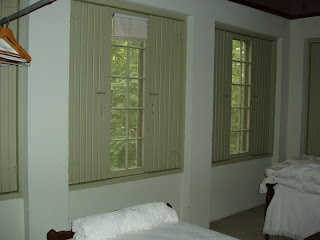 One of the things that must have made the summers more bearable years ago were the first and second-floor sleeping porches. The first-floor porch had windows added (along with lots of rough cedar paneling) sometime in the 1970's, but the upstairs sleeping porch is still pretty much intact. There are a few casement windows, and each one is flanked by a pair of shutters. Behind each shutter is a screen that can be opened up to ventilate the room.
Quaint as the sleeping porch is, in this heat, I'll take our window-unit-air-conditioned bedroom anytime. Speaking of which, it's about time to get ready for bed. I'd better start up the air conditioner so the bedroom will be bearable once I hit the sack....
Since most of our evenings are spent either indoors (sticky) or outside working on removing the old deck (downright sweaty), we are getting a little dose of early 20th-century Americana, particularly the decades of hot summers that were spent in this house. My curiosity got the best of me, so I started looking for weather archives online. The only records I could find for 1915 were accompanied by a request for a hefty $34.95 access fee to the information. NoThankYouVeryMuch.
I did find, however, some old newspapers on the Library of Congress website. One of the newspapers from the 1920's was The Columbia Evening Missourian. The front page of each edition reported the weather for the day. The print dates available varied, but I was able to find an edition that came right from the steamy summer of 1921. July 12th, to be exact. Warren G. Harding was president.
The high on July 12, 1921 was 94 degrees. The forecast for today was 95 degrees, although I'm not sure what the actual high ended up being. Regardless, it was hot.

Quaint as the sleeping porch is, in this heat, I'll take our window-unit-air-conditioned bedroom anytime. Speaking of which, it's about time to get ready for bed. I'd better start up the air conditioner so the bedroom will be bearable once I hit the sack....
Sunday, June 13, 2010
Some Follow-ups: Basement, Bugs, and HVAC
Here are a few follow-ups on some topics mentioned in previous blogs.
The Basement
A few weeks ago, I noted that the goal of doing my own jackhammering in the basement was to save money. At the time that I blogged about the hoped-for savings, I hadn't yet received the bill from the city for the rental/dumping charges on the roll-off container. The savings quoted by the company that installed the sump system was $1700 if I were to do my own jackhammering. Offsetting that savings was a cost of around $210 for a week's rental of a jackhammer. I just received the bill from the city for the roll-off service, which came to $270. Then there were also a couple of tools that I bought (a pick axe and a shovel with a straight forward edge, which made it easier to shovel the debris from the concrete floor). I'm including the cost of these tools, even though I will have them for the long term, because I wouldn't have purchased them had it not been for the basement project itself. They came to around $38. So bottom line, the savings ended up to be something like $1700 - $210 - $270 - $38 = $1182.
My wife asked me if I would have done the jackhammering myself if I had to do it all over again. I think the answer would still be "yes". The savings weren't as much as I had originally hoped, but money saved always amounts to more than just the obvious amount that wasn't spent. For example, let's say I'm in the 20% tax bracket. (Note: I have no idea what the actual IRS tax brackets are, or which one I fall into. I just plug the numbers into TurboTax every year and let it handle the rest.) If I were going to spend $1700, that means I would have to have earned more than $1700 in wages to bring home the $1700 to be paid to a contractor. I would have had to earn $2125 in order to have $1700 in take-home pay with which to pay the contractor. ($2125 - 20% income tax = $1700 take-home). Rather than paying that out to someone else though, I still have managed to keep $1182 in after-tax savings that I can now spend on something else that I need to do to the house. And since I like doing things myself, that $1182 will go a lot farther than it otherwise would.
But probably one of the best advantages to the whole thing is that I got to enrich my "life-experience" (and the experience of a few of my friends) by running a jackhammer! This is nuts, I realize, but hey....
The Bugs
We had the exterminator come about a week and a half ago. Our primary inspiration for inviting the exterminator was to get rid of the carpenter ants that, despite the lovely Midwest weather, wanted to come indoors to see us.
With the spraying complete, bugs are dying in droves. The basement seems to be their preferred place to expire. The ones that are the most dramatic about dying are the crickets. These guys do it up big time, which I will describe shortly.
I'm not sure what kind of crickets we have. They are utterly repulsive. They aren't like the black chirping crickets that I remember from growing up in Texas. These crickets are a light-tan-almost-albino variety. They don't even have a charming chirp. Their bodies are somewhat bulbous, and the don't crunch when you step on them -- they pop. Did I mention that they are absolutely repulsive? I'll take a roach over these things anytime. My wife still thinks roaches are worse. Well, at least she did think that. Thursday evening, we were working on getting the house cleaned up for a visit from my sister. My wife was tending to some laundry down in the basement. As she ascended the basement stairs, our conversation went something like this:
She: Augh! Augh! Disgusting!
Me: What?
She: The crickets! Augh! Disgusting!
Me: Are there a lot of them?
She: Not that many, but they are disgusting when they die!
Me: What do they do?
(Here comes the cricket drama I referred to earlier...)
She: Augh! Their legs fall off, and they lie there writhing and oozing liquid! Augh! Disgusting! Absolutely disgusting!
Seriously folks, leaking crickets are not something you want in your basement. I mean, we're glad they're dying, but the whole death process is as dramatic as something from a Shakespeare tragedy.
HVAC Update
We've heard back from one of the HVAC contractors with a bid for a dual (upstairs/downstairs) geothermal system. I'm meeting with one of the other contractors tomorrow to talk over his company's proposal. It seems odd to me that I haven't heard a peep from the other two contractors that are supposed to be bidding the job. Maybe with the hot weather we've been having, they're up to their eyeballs in requests from other people who want their system replaced now.
In the meantime, we're actually muddling through the hot weather pretty well. We have a window A/C in our bedroom which makes for pretty good sleeping, and there are lots of fans scattered throughout the house. Needless to say, shorts, T-shirts, and flip-flops are our standard uniforms here at home when we're not suited up to do demolition of one kind or another.
Well, now that the basement is cleaned up from all the jackhammering and plaster smashing, I think I'll go down and start putting my workshop back in order.....
Thursday, June 10, 2010
The Tree
I've been out of town most of this week, so nothing more has been done to the house since I worked on tearing off the old deck last Saturday. But that doesn't mean I don't have a story to share about the house this week!
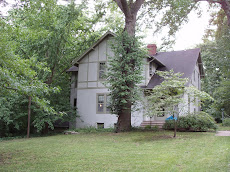
Back in March, we had some trees removed. There were a couple of hickory trees in the back yard that had suffered quite a bit of damage over the years. There was also a tall, skinny, crooked cedar tree that looked out of place in the middle of the back yard -- it looked a bit like what I call a "Dr. Seuss tree", if you know what I mean. There was also a big old female ginko tree right next to the house (it's just to the left of the house in blog photo, but you really can't distinguish it from the other trees around). The ginko was actually very beautiful, especially in the Fall when the leaves turned to brilliant yellow. Besides being too close to the house, the real problem with the ginko was the fact that it was the female variety. Now before any ladies in the audience accuse me of being a chauvinist, let me explain. The female variety of the ginko tree produces "fruit", that is, thousands of grape-sized berries. The berries aren't edible (as far as I know), but once they fall to the ground, they begin to decompose. You would not believe the stench. The only way I can describe it is to say it is a blend of a couple of other odors: 10% "dead animal" mingled with 90% "fresh dog poo". The smell lingers for weeks as the berries rot. Although my wife and I loved the looks of the tree, we knew it had to go. Our future master bedroom addition will be right next to where the ginko stood, and we couldn't fathom that smell just outside the window for a few months each year.
 As it turned out, branches that had broken off years ago had left voids in the upper trunk where rainwater collected and rotted the tree, so only about 15-1/2 feet of the trunk was still in good shape. The tree was huge, so the log that resulted was about 39 inches in diameter. It was so big that it had to be lowered with a crane so as not to leave a crater in the yard.
 The mill has a couple of big hydraulic arms on one side that picked up the log and rolled it onto the cutting area. I had also arranged with Mike to dry the wood for me in his solar kiln. The kiln can only take stock up to 12 feet long, so I had him divide the trunk into an 8 foot section and a 7-1/2 foot section. He cut it in two with his chainsaw, then the fun began!
 At first, he made several passes to cut off the bark, followed by several plain-sawn slabs to get the log down to a roughly 22-inch square "post". Then, as I had requested, he began quarter-sawing the rest of the wood. If you're not familiar with the various types of cuts that can be done when producing lumber, quartersawn oak is the type that yields what is known as "tiger oak", which is common on lots of antique oak furniture.
 By the time Mike and his wife (they work as a team) had finished sawing up the tree trunk, there was what I would estimate to be about 300 board feet of plainsawn boards, plus about 500 board feet of quartersawn boards. The great thing is that this will likely be more than enough lumber to build all of the cabinets and bathroom vanities for our remodeling project.
 One thing I forgot to mention was that once the tree had been cut down, I counted 96 annual rings in the trunk. That means the tree was a seedling when the house was built in 1915. I think it is only fitting that the tree that stood watch over the front porch for so many years should be incorporated back into the house as we remodel it. There aren't too many people who can say that the wood for their cabinets and trim grew right out in the front yard!
Back in March, we had some trees removed. There were a couple of hickory trees in the back yard that had suffered quite a bit of damage over the years. There was also a tall, skinny, crooked cedar tree that looked out of place in the middle of the back yard -- it looked a bit like what I call a "Dr. Seuss tree", if you know what I mean. There was also a big old female ginko tree right next to the house (it's just to the left of the house in blog photo, but you really can't distinguish it from the other trees around). The ginko was actually very beautiful, especially in the Fall when the leaves turned to brilliant yellow. Besides being too close to the house, the real problem with the ginko was the fact that it was the female variety. Now before any ladies in the audience accuse me of being a chauvinist, let me explain. The female variety of the ginko tree produces "fruit", that is, thousands of grape-sized berries. The berries aren't edible (as far as I know), but once they fall to the ground, they begin to decompose. You would not believe the stench. The only way I can describe it is to say it is a blend of a couple of other odors: 10% "dead animal" mingled with 90% "fresh dog poo". The smell lingers for weeks as the berries rot. Although my wife and I loved the looks of the tree, we knew it had to go. Our future master bedroom addition will be right next to where the ginko stood, and we couldn't fathom that smell just outside the window for a few months each year.
Despite my lengthy description of the ginko tree, this blog entry is actually about the large red oak tree that is positioned right in front of the house in the main blog photo. That tree was also removed in March, but I had this kind of crazy idea that I think will turn out to be really cool. When the tree was taken down, I told the tree service to leave as much of the trunk as was still in good shape. The trunk went up about 22 feet before there were any branches, so I was hopeful that there would be a lot of good lumber there.
 As it turned out, branches that had broken off years ago had left voids in the upper trunk where rainwater collected and rotted the tree, so only about 15-1/2 feet of the trunk was still in good shape. The tree was huge, so the log that resulted was about 39 inches in diameter. It was so big that it had to be lowered with a crane so as not to leave a crater in the yard.
Before I had the tree taken down, I had done some research to see if I could figure out how to get the log milled into usable lumber. After some searching on the internet, I found a guy (Mike) with a mobile lumber mill who lives less than 20 miles away. Woo hoo! When he showed up, the contraption below was what he brought to cut the lumber.
 The mill has a couple of big hydraulic arms on one side that picked up the log and rolled it onto the cutting area. I had also arranged with Mike to dry the wood for me in his solar kiln. The kiln can only take stock up to 12 feet long, so I had him divide the trunk into an 8 foot section and a 7-1/2 foot section. He cut it in two with his chainsaw, then the fun began!
 At first, he made several passes to cut off the bark, followed by several plain-sawn slabs to get the log down to a roughly 22-inch square "post". Then, as I had requested, he began quarter-sawing the rest of the wood. If you're not familiar with the various types of cuts that can be done when producing lumber, quartersawn oak is the type that yields what is known as "tiger oak", which is common on lots of antique oak furniture.
 By the time Mike and his wife (they work as a team) had finished sawing up the tree trunk, there was what I would estimate to be about 300 board feet of plainsawn boards, plus about 500 board feet of quartersawn boards. The great thing is that this will likely be more than enough lumber to build all of the cabinets and bathroom vanities for our remodeling project.
 One thing I forgot to mention was that once the tree had been cut down, I counted 96 annual rings in the trunk. That means the tree was a seedling when the house was built in 1915. I think it is only fitting that the tree that stood watch over the front porch for so many years should be incorporated back into the house as we remodel it. There aren't too many people who can say that the wood for their cabinets and trim grew right out in the front yard!
 Friday, June 4, 2010
Plaster Dust

Last weekend was a monumental step toward making the house more mechanically suited for modern living. Two long days of work resulted in the removal of the plaster ceiling in the basement, which will make way for new plumbing, wiring, and ducts.
Armed with hammers, respirators, ear plugs, leather gloves, and goggles, my wife and I started smashing out the ceiling. Fortunately, the basement doorways are all juuuuust wide enough for the wheelbarrow, so we were able to shovel the rubble into the wheelbarrow and walk it out of the basement, through the garage, and into the roll-off dumpster. With all of the strips of wood lath that we removed, I mused about opening an antique yard stick company. Seems a shame to throw away all those sticks -- I can just imagine some guy who builds artsy birdhouses to sell at craft fairs wincing at the thought of tossing them out. It chafes against my inner packrat to throw them away, but I'll let logic win out this time. Kindling, anyone?
Along with taking out the plaster ceilings, I also removed a wall that separated what was once the coal room from the boiler room. The wall was constructed of blocks of what many folks around here refer to as "clay tile". I'm not sure that is exactly the correct term for these blocks. In my mind, they are essentially the early twentieth-century equivalent to today's cinder blocks. They are smaller and lighter than cinder blocks and made of a terra cotta type clay. After smashing a few of the top layers of the blocks, I was able to just start rocking the wall back and forth little by little until I was able to push it over. There's nothing like taking down a masonry wall with your bare hands to make you feel just a smidge more manly (if only in your own imagination).

Now that the plaster is gone, all of the wiring and pipes are exposed in the basement. OH MY GOODNESS. The wiring is simultaneously fascinating (from a museum/historical perspective) and terrifying. Except for the "upgrades" -- and I use that term loosely -- that occurred in the 40's, 50's, 60's, and 70's, the basement is mostly wired with the original knob-and-tube wiring. It all appears to be in good shape, but I'm certain the breaker is rated for more amperage than the wire should carry. Not to worry, though. I'm very careful about how much load I put on anything connected to that circuit. I'll be replacing it soon.
It's a relief to have all that plaster torn out and the wall taken down. It was a messy job that I had not been looking forward to. When we were finished with the whole thing, I looked something like a coal miner, covered in soot. The shower I took afterward was one of the longest I've had in quite some time. Ahhhhhhh....
Subscribe to:
Posts (Atom)